Voxelab Aquila C2 Upgrades
Some of them worth it, most of them not.
It’s been about a month since I got my 3d printer. I haven’t printed Lange Jaap yet, but I have done a few upgrades. Here’s my experience with them.
The first thing to say is I enjoy tinkering, and that was one of the factors that went into these upgrades. The Voxelab aquila ia a very capable machine, these upgrades won’t make a big difference.
3d Printed
Tool Holder
Recommended
The one of the first things I printed was this tool holder by antibimmer on Thingiverse. It holds all of the tools which come with the printer. My only gripe is as the printer jolts the hex keys jangle which can get a little bit annoying.
Z Axis Stabiliser
Not Recommended
I had this z axis stabiliser by benawhite on for a while, however I have since found out they do more harm than good.
Z Axis Knob
Kinda recommended
Made by Baschz, the z axis knob lets you move the extruder up and down manually, until your PLA threads strip and you can only move the extruder up. Which granted is 90% of the movement I would manually do with it.
Having a z axis adjustment knob is really useful, and eventually I’ll find a more permanent solution - either buying a metal one, or using threaded inserts.
Also it gives a nice visual indicator that the printer is working.
Filament Guide
Recommended
The the z axis knob meant I had to move my spool of filament closer to the middle of the printer (the filament was getting caught on the knob). Which in turn sharpened the angle at which the filament went into the extruder. Fillboyt’s filament guide addresses this.
Something which hasn’t cause me issue yet but I’m conscious of is its filament rubbing against other rough filament. Eventually I want to replace it with something which has a ball bearing.
Filament Spool Holder
Recommended
With this new harsh angle and filament guide, I saw the spool would jolt quite often. I wasn’t just nervous about the strain it was putting on my extruder, but also the potential for the spool to fall on the printer. Fortunately Emolan’s spool holder adds some ball bearings to have a smoother rotation.
Belt Tensioner Covers
Kinda recommended
This was mostly a matter of me being low on black PLA and wanting to use it up. HiddenP56’s belt tension covers add simple covers.
A note: it fits the x axis perfectly, however the plats on the y axis are slightly too large.
Cable Chains
Recommended
One of the earlier problems I had with the Aquila were the cables falling onto the build plate. Nothing ever came of it but it worried me. Antibimmer’s cable chains did the trick for me.
A couple of things to note.
They recommend 3 sets of chains with 16/14/22 links. I found I had to print a couple extra to fit all of the wire.
If you’re printing in PLA, don’t attach the build plate adaptor, the end of the chain has four holes for cable ties which work perfectly.
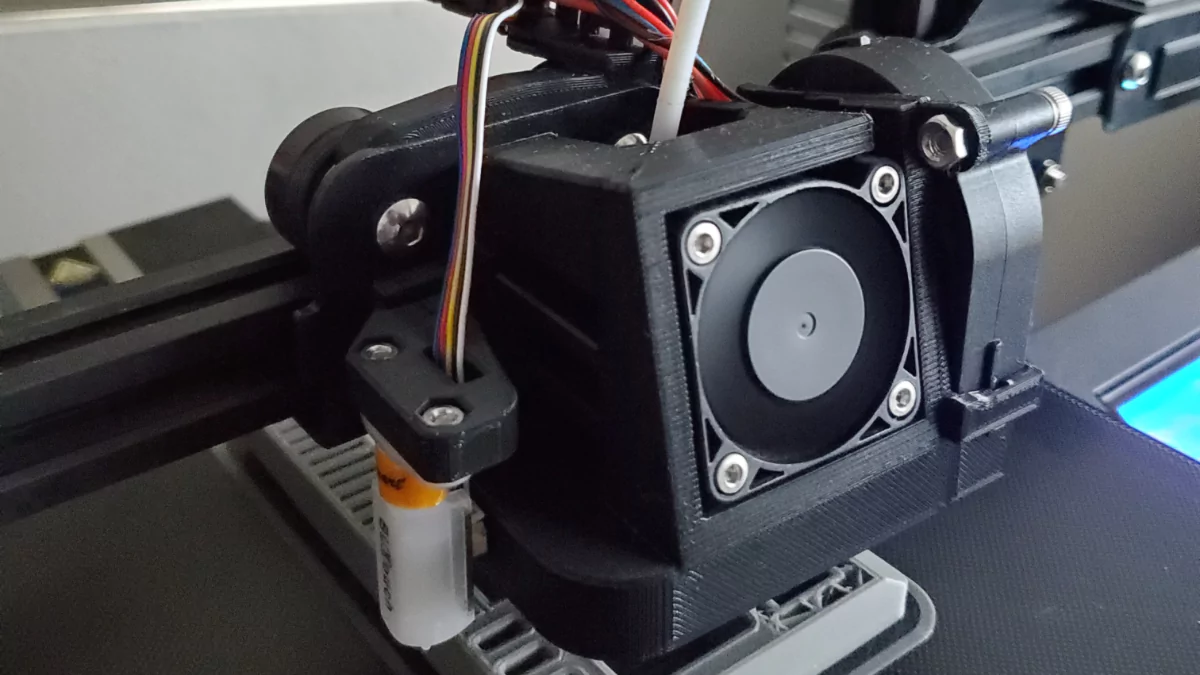
Satsana Fan Shroud
Not recommended on its own
There are a few versions of the Satsana on thingiverse, I’m using Ukic’s. The reason I opted for this had more to do with some of my purchased upgrades.
I’m not actually sure if it has made much of a difference in my print quality. They haven’t gotten worse.
I think it looks much more stylish than the stock one though.
Purchased
5150 Fan
Not recommended on its own
The Satsana fan I purchased requires a 5150 fan to cool the hot end, I got whatever the cheapest one on ebay was.
That was probably my first mistake.
My first issue was the cable was about 10cm long. While the mainboard it was supposed to plug into was in the realm of much further away (I didn’t measure, but I’m going to guess something like 50cm).
No problem I’ll just extend the cable with some wire, solder and some heatshrink tubing.
That was my second mistake.
I should have tested the fan before cutting its wire up. First I assumed the fan wasn’t polar, second I assumed I had the correct polarity. I was wrong about both of them. So after some troubleshooting I got the fan working, and its pretty good. Its a bit quieter than the stock one and again looks cool.
Mellow NF Smart Hotend
Not recommended if you’re just printing PLA
I don’t really have any justification for buying the NF Smart Hotend (I got a 24V, set 3 Copper). It’s nice, it does the job well, I think the blue silicon cover looks stylish, and I hear it’s worth it for printing at higher temperatures, which I do not.
If installing in an Aquila, I recommend using your stock thermistor and heat cartridge if you can (the little rods/wires which go into the heater block). In my case they were pretty stuck, and I wanted to “““upgrade”””. I ended up installing the included ones. They don’t come with the same plug the Aquila mainboard expects, fortunately I had a spare 5150 fan I could sacrifice for parts.
One part I found a bit finicky was screwing in the heat sink and nozzle into the heater block. You can’t screw it in all the way, or they wont align properly.
Edit: a day after
The screwing in part is very finicky, I ended up clogging the hotend and then broke it while trying to clean it. A new hotend is on the way.
Edit: a few weeks later
I’ve replaced the hotend, it seems the best way to go is applying thermal paste to the threads, screw the nozzle in almost entirely, screw in an align the heatsink, then finish screwing in the nozzle.
Terminal Connectors
Recommended if you’re adjusting a connection on the mainboard.
I’m not actually sure what these connectors are called, but you see them in crimping kits. (RS has them listed as pin connectors)
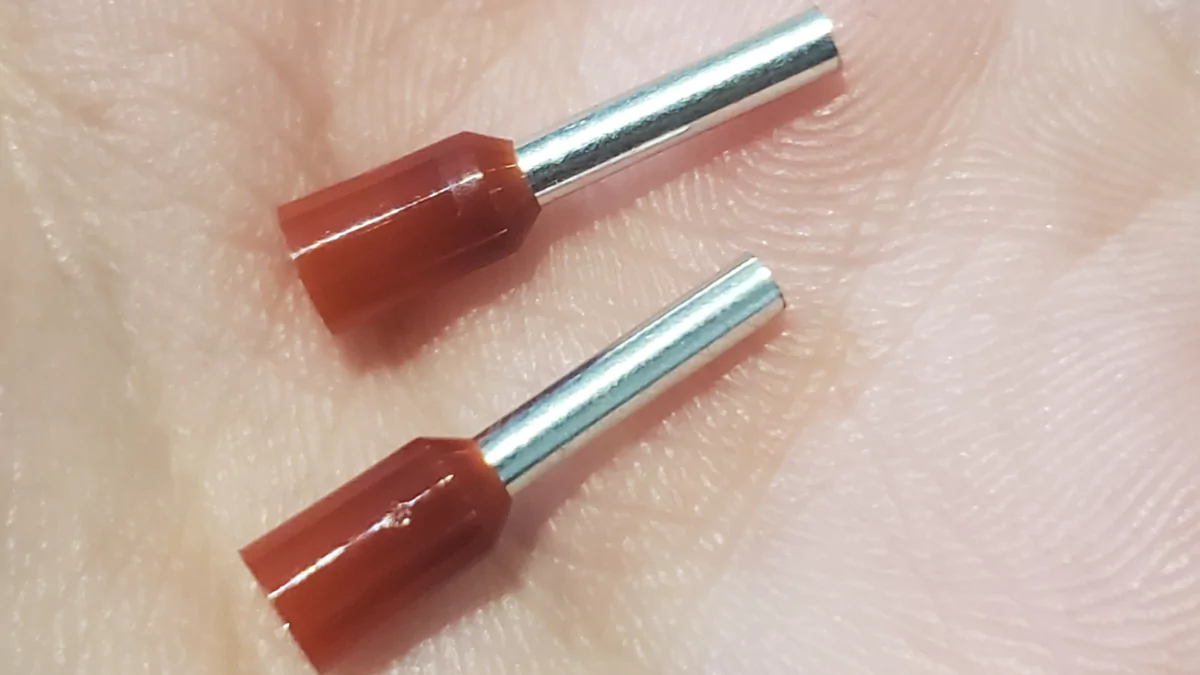
They’re very easy to install and should extend the life of the wire. That is granted if you’re changing the connection of the mainboard. I wouldn’t go out of my way to do this, but if the opportunity presents itself.
BL Touch
TBD
Like a fool, I assumed the Voxelab Aquila C2 had a port for BL Touches like the other Aquila’s. Turns out it doesn’t, so I’ve ordered a BigTreeTech SKR MINI E3 v3.0 and BTT TFT35 E3 v3.0 touchscreen (it turns out the stock Aquila screen isn’t compatible with that mainboard).
I’m still waiting for them to arrive. Time will tell whether it was all worth it.
Edit: a day after
The board did arrive, BL touch is worth it the levelling is much nicer. However there are certain quirks related to it such as measuring the XYZ offsets.
I also initially had trouble setting up the Z offset, but that was more of a board issue.
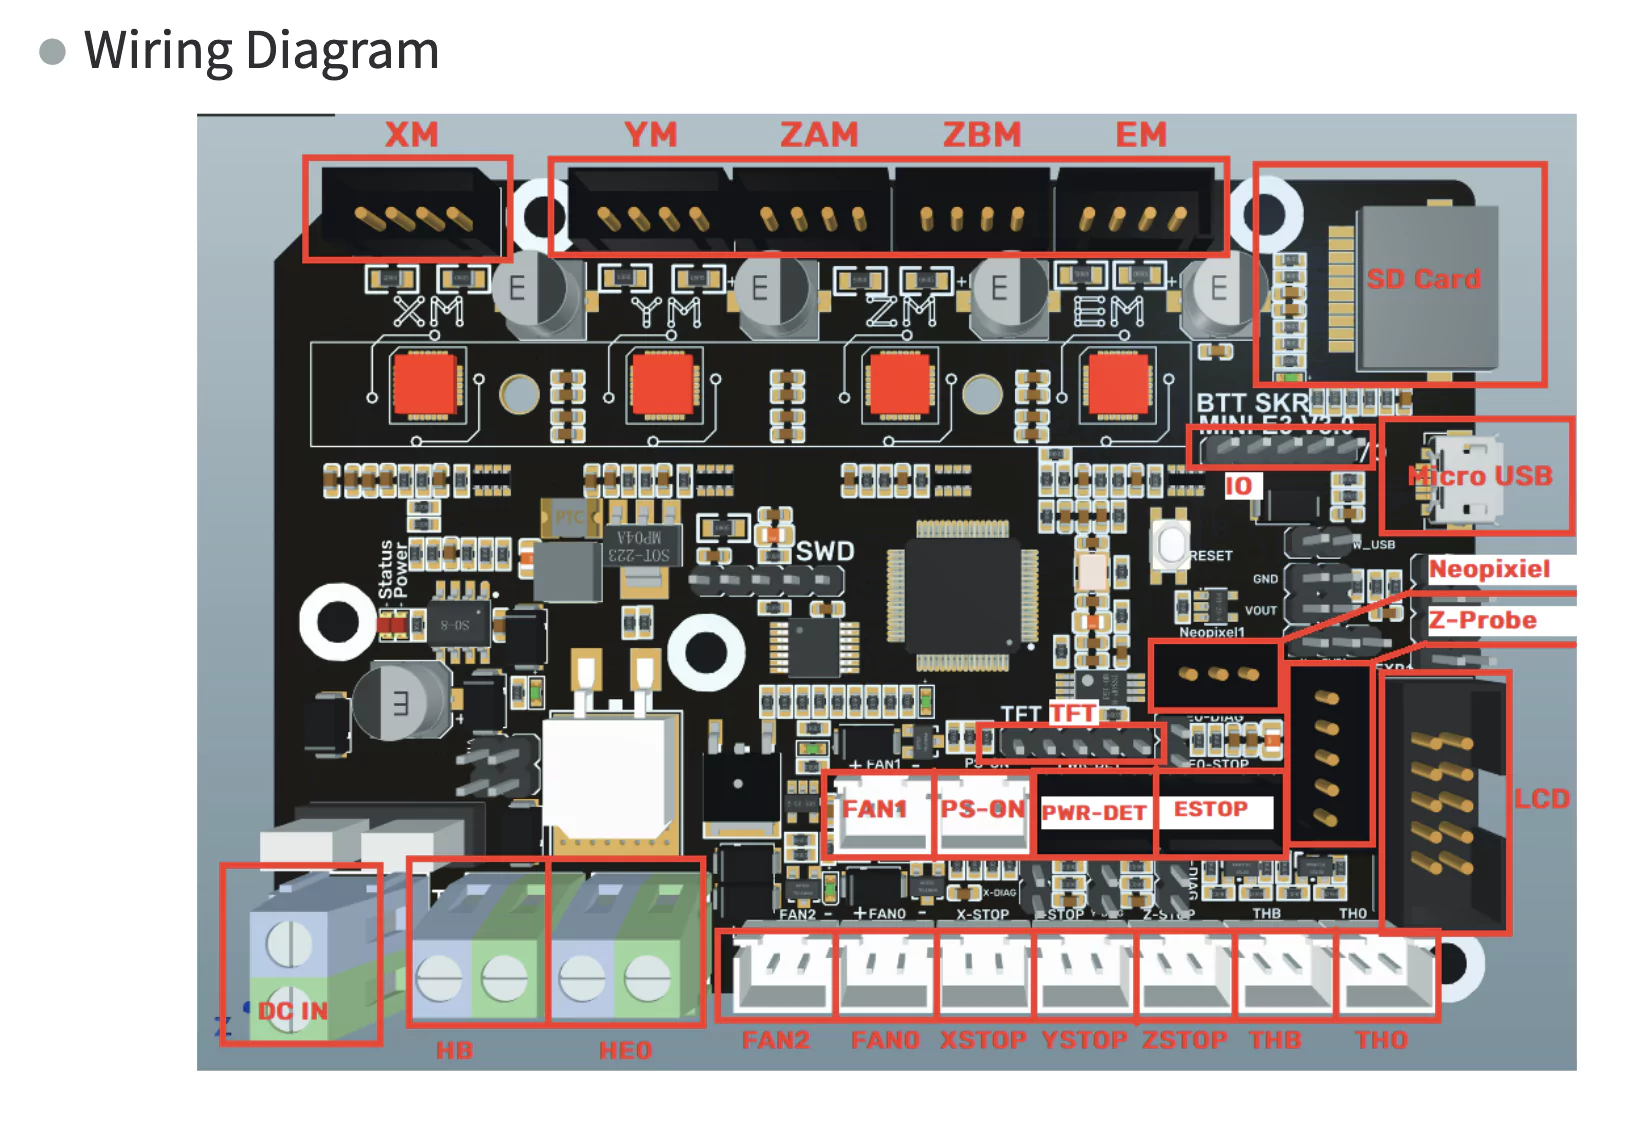
BIGTREETECH SKR Mini E3 V3 Board + TFT35-E3 V3
Worth it
They’re separate upgrades but I’m kind of grouping them. I picked up the Mini E3 to be able to use the BL touch.
The wiring is pretty close to the C2’s mainboard with a couple of differences. The XYZ Stop ports are in slightly different locations. The labelling for TB and TH are different. (TB = THB, TH = TH0). The biggest were the fan ports which took a little trial and error.
First part is you’ll have to convert the terminal plugs to the two pin variety.
Second part are which fans are which.
Fan 0 is nozzle
Fan 1 is heatsink
Fan 2 is mainboard
Here’s a diagram of the mainboard for reference.
Afterwards its smooth sailing, didn’t have to do any adjustment for my existing hardware, and the silents steppers are a dream.
Except for the BL touch.
By default the Mini E3’s firmware don’t allow for negative Z offsets and will complain if you attempt to do so.
BTT has a fork of Marlin as well as Ender 3 BL Touch Configurations. I have my own fork here.
In configuration.h the only change I had to do was commenting out #define MIN_SOFTWARE_ENDSTOP_Z
The TFT is also a nice enhancement it provides a much nicer UI than Marlin, but also lets you do general quality of life things such as Z probe adjustment, presets for bed levelling movements and lets you print from its onboard SD card and USB ports.
Couple words of warning for the Aquila though.
-
It will fit the stock screen shroud plate but, the back is too thick to reattach it to the printer itself, I have mine set up with only one of the bolts attached.
-
When in touchscreen mode do not use the knob. while it will adjust whatever value is displayed on screen, it also adjusts the print screen in the background. I had quite a few prints with random speeds before realising this.
Extruder
Probably not worth it.
I picked up a dual gear replacement extruder (I got the Double Pneumatic version, but it makes no difference).
Getting both gears to align is a bit of a pain but not the end of the world.
After installing it, I noticed I would get this clicking noise while printing, and saw the filament jolting at the extruder. This is how I learnt my calibration needed work. Which probably provided a bigger upgrade to my printing than the extruder itself.
Anti-Backlash Nut
Worth it if you are just about to assemble your printer.
I picked up a T8 anti-backlash nut (I got Lead 8mm, 2set) because I heard it would prevent drooping - a problem which I haven’t experienced yet. But it was cheap so why not.
I can’t tell if it has made a difference. But I can tell it’s a pain to get installed if you have an already assembled printer. You need to remove the z axis pole, which causes the extruder to fall, all while trying to screw in a spring loaded nut.
Not very fun.
Bed Levelling Springs
The last bought upgrade I got is the cheapest, and the one which has made the most difference so far bed levelling springs (I got Yellow, 4PCS 8X20)
Bonus: Mac Mini
I have a mac mini laying around, and now I plug it directly into the printer. Over all its a pretty nice experience, the only problem is remote desktop is a little bit laggy.